The primary activities associated with managing user accounts, such as
creating and deleting accounts, are performed by IPA Administrators.
Other activities, such as editing various user account attributes,
changing group membership, etc., can be delegated to other accounts.
You can use either the Web interface or the command line to manage user
accounts. Each interface provides identical functionality, however the
Web interface displays a greater range of information for each user in
an easy to use format.
When you add new user accounts using the Web interface, mandatory fields
are shown in a different color. Certain other fields, such as Common
Name, Display Name, Initials, Login, and E-mail Address, are populated
automatically. You can change these values as required. The UID, GID,
and Home Directory are automatically generated by the server.
If you use the command line to add user accounts, you will be prompted
for any information that is required.
On the IPA Home Page, click Add User in the Tasks list to display
the Add User page.
Enter the required details for the user.
If required, add the user account to a group. All users are
automatically added to the global group ipausers.
When you have entered the required account details, click Add
User.
Note:
It is not essential to provide a password when you create an
account. For example, you might create an account for a service
(rather than a user), and such an account may not require a
password. For a user account, however, you need to provide an
initial password so that the user can log in to their account.
Users are required to change their initial password the first time
they log in.
The following is an example of adding the Identity and Account details
for a new user using the Web interface.
Use the ipa-adduser command to add users to IPA. You can pass
attributes directly to the command, or run the command with no
parameters to enter interactive mode.
For example, to create the user jlamb:
$ /usr/sbin/ipa-adduser -f John -l Lamb -p secret jlamb
The following is an example of using the ipa-adduser command in
interactive mode to create a user account:
$ /usr/sbin/ipa-adduser
First name: Jinny
Last name: Pattanajee
Login name: jpattan
  Password:
  Password (again):
gecos[]: Jinny Pattanajee
home directory [/home/jpattan]:
shell [/bin/sh]:
jpattan successfully added
Press Enter to accept the default values (provided in square
brackets), or enter an alternative.
Refer to the ipa-adduser man page for more information.
Members of the IPA Administrators group can edit any of the details of
any user account. Other users may also be able to edit certain details
of user accounts, according to the delegations that have been
configured.
Click Find Users in the Tasks list to display the Find Users
page.
Enter the name or a key word of the user that you want to edit in the
search field, and click Find Users.
In the search results, click the name of the user that you want to
edit. The user is displayed on the View User page. If the user
does not appear in the search results, try using broader search
terms.
Click Edit User to display the Edit User page. This displays
the various fields where you can edit user attributes.
Edit the user attributes as required, and click Update User. Note
that not all fields are immediately editable; you need to select the
Edit Protected Fields checkbox to edit the Password, Home
Directory, and some other fields.
Caution:
It is possible to edit the UID and GID of user accounts, however
this is not recommended. Changing these IDs will not cause
problems internally for IPA, but it can lead to other issues such
as changes to file ownership, security problems, etc.
IPA user accounts can be set to a status of Active or Inactive. If
you inactivate a user account, that user can no longer log in to IPA,
change their password, or perform any other functions. The account and
all associated information still exists, but is inaccessible by the
user.
If you delete a user account, all of the information for that identity
is lost. The actual user account, home directory and other information
still exists, be it on a server, local machine, or some other provider,
but it is no longer accessible via IPA.
Unlike with inactivation, if you delete a user account, it cannot be
retrieved. If you find that you need this user account again, you need
to recreate it and add all of the account details manually.
IPA uses groups to facilitate the management and administration of both
users and permissions. Three groups are created by default during the
installation process: ipausers, admins, and editors. The IPA
Administrator is a member of the admins group; you can not remove the
IPA Administrator from this group, nor can you remove the Administrator
or admins group. These are all required for IPA operation. All other
users belong to the global group ipausers, and you can create as many
additional groups as you require. The editors group is a special group
whose members have certain administrative permissions within IPA,
however these permissions are not as extensive as those of IPA
Administrators.
You can create groups based on the departments within your organization,
for example, Engineering, Finance, and HR. You can also create groups
based on the permissions, or roles, required to manage your
departmental or other groups.
You can also create nested groups. For example, you can create a group
called “Documentation”, within which you could create groups called
“Writers”, “Editors”, and “Translators”. You can add users to each of
the sub-groups to suit the needs of your organization.
Note:
Any users that you add to a sub-group automatically become members
of the parent group.
Caution:
You should avoid the creation of cyclic groups - groups whose
members include groups that contain their own parents - because it
can lead to unexpected behavior.
You can edit any of the attributes that define a group, as well as add
or remove members. Some attributes are read-only by default, however you
can elect to edit these attributes if required.
Click Find Groups in the Tasks list to display the Find
Groups page.
Enter the name or a key word of the group that you want to edit in
the search field, and click Find Groups.
In the search results, click the name of the group that you want to
edit. The group is displayed on the View Group page. If the group
does not appear in the search results, try using broader search
terms.
Click Edit Group to display the Edit Group page. This
displays the various fields where you can edit group attributes.
Edit the group attributes as required, and click Update Group.
Note that if you want to change the Name or GID of the group, you
need to select the Edit Protected Fields checkbox.
Caution:
You should not change the Group Name or GID unless absolutely
necessary, because it can have unexpected affects on permissions,
ACIs, and other aspects of IPA functionality.
Note:
You can click Cancel Edit at any time to cancel editing the
group and abandon any changes.
IPA groups can be set to a status of Active or Inactive. If you
inactivate a group, all of the members of that group are also
inactivated. This means that they cannot log in to IPA, change
passwords, or perform any other functions. The accounts within an
inactivated group still exist, but they are inaccessible.
This also applies to nested groups. If you inactivate a group, then any
groups within that group are also inactivated, as are their members. You
can override the cascading effect of inactivation by activating
individual users or groups.
If you delete a group, only the immediate group is removed; members of
the group are not affected. That is, unlike inactivation, there is no
cascading effect when you delete a group.
Note that when you delete a group, any delegations that you might have
set up that rely on that group will also be removed. For example,
suppose you added an Engineering Manager group specifically to set up
delegations for the Engineering Manager. If you deleted the Engineering
Manager group, then those delegations would also be lost. Unlike with
inactivation, these cannot be retrieved. If you find that you need this
group and delegation again, you need to recreate them.
Managing Certificates and Certificate Authorities#
If you have your own or a preferred Certificate Authority (CA) and want
to use your own certificates, IPA provides the necessary tools to import
certificates for use by the Directory Server and HTTP Server. While not
a prerequisite for the correct operation of IPA, you should also save an
ASCII copy of your CA certificate as /usr/share/ipa/html/ca.crt to
ensure that customers download the correct certificate.
Use the ipa-server-certinstall command to install your own
certificate. You can install the certificate for use by the Directory
Server, HTTP Server, or both.
To install the certificate for use by the Directory Server:
To continue using the Firefox auto-configuration feature, you need an
object-signing certificate, and you need to regenerate the
/usr/share/ipa/html/configure.jar file.
Use the following series of commands to:
Create a directory to host the certificate database.
Apart from authenticating users, Kerberos can also provide
authentication for services that are accessed by users. For example, you
can use Kerberos to provide authentication for HTTP, SSH, and other
services. In this scenario, mutual authentication must occur between the
service and the KDC (rather than between the user and the KDC). That is,
each service must have a valid principal (the service principal) on
the server, and the service must use a shared secret to authenticate
against the KDC. This is true if the service is provided on the same
machine as the KDC, or on a separate machine.
Clients use the service principal to tell the KDC which service they
need a ticket for. The KDC uses the service principal to provide a
secret key to the service when the service principal is created. Service
principals and their associated keys are stored in a keytab file.
Without an appropriate keytab the service has no way of authenticating a
client, and the KDC has no way of providing the client with a ticket.
It is important to understand the critical role that service principals
and their associated keys play, especially when those services are
accessed by multiple users. While a valid ticket exists for a specific
service, users can access that service using their Kerberos credentials.
For example, if a user tries to mount an NFS directory using Kerberos,
then both the NFS server and the user require a valid principal, and
share a secret key with the KDC. This is established during the IPA NFS
configuration on the server. If the secret key is replaced on the
server, for example, by getting a new keytab, then you need to ensure
that the new keytab is exported to any clients that need NFS mount
access to the server. Failure to export an updated keytab can cause
problems that are difficult to isolate. For example, existing service
connections may continue to function, but no new connections may be
possible.
Caution:
Clients attempting to mount NFS exports rely on the existence of a
valid principal and secret key on both the NFS server and the
client machine.
Service principals are typically released per service, although it is
possible for one service principal to be used for more than one service.
You can use the WebUI to search for any issued service principals, and
also to create new service principals. For security and other reasons,
however, it is not possible to retrieve a keytab using the WebUI. This
has to be done either on the command line on the system where the
service is accessed, or on the IPA server itself, and the keytab then
exported to the client machine.
The following example demonstrates creating a service principal and
keytab on a client machine for the SSH service. The client machine is
ipaclient.example.com and the IPA server is ipaserver.example.com:
The realm name is optional. The IPA server automatically appends
the Kerberos realm for which it is configured. You cannot specify
a different realm.
The hostname must resolve to a DNS A record in order to ensure
that it will work with Kerberos. You can use the –force flag
to force the creation of a principal should this prove necessary.
The ipa-getkeytab command is part of the ipa-clientpackage, which is only available for clients running Red Hat
Enterprise Linux 4 or 5, Fedora 7, 8, or 9. For other clients, you
need to use this procedure on the server and manually copy the
keytab to the client.
You can use the -e flag to include a comma-separated list of
encryption types to include in the keytab. This supercedes any
default encryption type. Refer to the ipa-getkeytab man page
for more information.
Caution:
The ipa-getkeytab command resets the secret for the specified
principal. This means that all other keytabs for that principal
are rendered invalid.
The Linux NFS implementation still has limited encryption type
support. You may need to use the -e des-cbc-crc to the
ipa-getkeytab command for any nfs/<FQDN> service keytab
you want to set up, both on the server and on all clients. This
will instruct the KDC to generate only DES keys.
5. Run the following series of commands to reload the NFS configuration
and restart the required services:
# exportfs -a# restart services# service nfs restart# service rpcgssd restart
IPA supports access control using a process known as delegation. This
provides a means of assigning different permissions to the various users
and groups that you create.
When the IPA server is initially configured, it creates an
administrative account named admin. You use this initial account to
create any further administrative or other accounts required by your
deployment.
Note:
The admin account cannot be deleted or renamed, nor can it be
removed from the admins group.
Normally you would delegate access control to a group, or role. For
example, you might create one group called “Engineering Manager” and
another called “Office Manager”. These would be dedicated groups for the
Engineering Manager and Office Manager respectively.
You would then create a delegation to specify the permissions associated
with each group. An Engineering Manager might be able to modify the
attributes of everyone in the Engineering group, and the Office Manager
would be able to change details related to the office, such as fax
numbers, office contacts, etc.
When you add the Engineering Manager to the Engineering Manager group,
they automatically gain all of the associated permissions. If the person
holding that position changes, you simply change the groups that that
user belongs to. There is no need to modify any other values.
Create the group to which you want to delegate administrative
privileges (the source).
Create the group over which this group should have administrative
privileges (the target).
On the IPA home page, click Delegations in the Tasks list to open
the Delegations page.
Click Add New Delegation to open the Add Delegation page.
In the Delegation Name field, type a descriptive name for the
delegation.
In the People in Group field, enter the CN of the group or type a
suitable search term and click Find. This is to determine the
source, or the group that will receive the delegation.
In the search results, click the required group name. If the required
group does not appear in the search results, try a different search
term to widen your search.
In the Can Modify list, select the appropriate check boxes for
the delegations that you want to apply. For example, you can specify
that this group can modify the home directory, login shell, and org
unit of its subjects.
In the For People in Group field, enter the CN of the group or
type a suitable search term and click Find. This is to determine
the group that will be subject to the delegation.
Click Add Delegation to create the delegation.
Note:
You can only create a delegation for one target at a time. If you
require that a source have administrative control over several
targets, you need to create a separate delegation for each target.
The following diagram illustrates creating a delegation for the
Engineering Manager over the Engineering group.
You can configure Red Hat Enterprise Linux and Fedora to allow or deny
access to IPA resources and services based on the configuration of the
host from which access is attempted. This requires modification to the
/etc/security/access.conf and /etc/pam.d/system-auth files, as
described below:
1. Modify the /etc/security/access.conf file to include the
following lines:
+:root:ALL+:ipausers:ALL-:ALL:ALL
2. Modify the /etc/pam.d/system-auth file to include the following
line:
The IPA policy specifies various constraints on the way that users can
interact with IPA system as a whole. This affects their user accounts,
the details that they can view and edit, minimum password requirements,
etc., and also the range of searches that they can perform.
You can configure various aspects of the IPA search functionality to
suit your deployment. For example, you can restrict the number of fields
that a user can base a search on, or limit the number of records
returned for any particular search.
IPA supports the following search configuration attributes:
Search Time Limit: The maximum time, in seconds, that a search
will run before failing.
Search Records Limit: The maximum number of records that a search
can return. Set this value to zero (0) to specify no limit. The
directory server limit (the default value is 2000) still applies.
User Search Fields: This specifies the fields to search within
user details for the values entered by a user.
Group Search Fields: This specifies the fields to search within
group details for the values entered by a user.
IPA supports the specification of various password attributes that help
to ensure the security of your system, and also that of individual user
accounts. You can specify the password lifetime, length, and the types
of characters required in a password, all as part of the IPA Password
Policy.
Note:
In IPA 1.0, the password policy is enforced by the KDC. Only a
limited number of attributes are currently supported, however this
will be extended in later versions.
Because the password policy is enforced by the KDC, any further
policy specifications that you implement as part of the Directory
Server password policy will not be visible in IPA, and neither
will they be enforced.
If you reset a password using “cn=Directory Manager” credentials (only
possible if you manually perform an LDAP password change operation) then
you override any checks and the password is set to whatever you specify.
The IPA password policy is ignored.
If you reset a password using “admin” credentials (that is, as part of
the admins group), the IPA password policy is ignored, but the
expiration date is set to “now”. This means that the user is forced to
change their password immediately, and the password policy is then
enforced. This is also true for users who have had password changing
rights delegated to them.
This is done so that the administrator can easily create users with
“default” passwords and reset user’s passwords, but will not know the
actual, final password entered by the user. Further, any password that
is trasmitted from the administrator to the user, even over insecure
channels, is a temporary password. Consequently, it is not critical if
it is accidentally disclosed, provided that the user promptly resets it.
If you are logged in as a regular user (that is, you are not part of the
admins group, or possessed of any elevated privileges), then you can
only change your own password, and these changes are always subject to
the IPA password policy.
You can use either the Web interface or the command-line to edit the IPA
password policy. However, you can only edit those attributes supported
by IPA.
The password policy is enforced by the pwd_extop slapi plug-in. IPA
1.0 supports the following password policy attributes:
Minimum Password Lifetime (krbMinPwdLife): The minimum period of
time, in hours, that a user’s password must be in effect before the
user can change it. The default value is one hour.
You can use this attribute to prevent users from changing their
password to a “temporary” value and then immediately changing it back
to the original value.
Maximum Password Lifetime (krbMaxPwdLife): The maximum period of
time, in days, that a user’s password can be in effect before it must
be changed. The default value is 90 days.
Minimum Number of Character Classes (krbPwdMinDiffChars): The
minimum number of different classes, or types, of character that must
exist in a password before it is considered valid. The default value
is zero (0).
For example, setting krbPwdMinDiffChars = 3 requires that
passwords contain at least one character from three of the supported
classes.
The following character classes are supported:
Upper-case characters
Lower-case characters
Digits
Special characters (for example, punctuation)
The following special classes also exist:
Number of repeated characters
This weights in the opposite direction, so that if you have too
many repeated characters you will not meet the quorum to satisfy
the “level” expressed by krbPwdMinDiffChars
Minimum Length of Password (krbPwdMinLength): The minimum number
of characters that must exist in a password before it is considered
valid. The default value is eight characters.
Password History Size (krbPwdHistoryLength): The number of
previous passwords that IPA stores, and which a user is prevented
from using. For example, if you set this value to 10, the IPA server
prevents a user from reusing any of their previous 10 passwords. The
default value is zero (0) (disable password history).
Note:
If password history checking is enabled, and a user attempts to
use one of the passwords in the history list, the error message
returned by the system may be misleading. For example, you may see
the following error:
A database error occurred: Constraint violation: Password fails to meet minimum strength criteria

This is because ``python-ldap`` prevents the retrieval of extended
information on password policy failures over LDAP. There is
currently no workaround for this limitation.
Future versions of IPA will support the concept of automatic user
notification when passwords are due to expire. This feature is not
available in IPA 1.0. You can, however, manually search for passwords
that are due to expire by a specified date.
For example, to retrieve all user entries whose password is due to
expire before March 1st, 2008, run the following command:
If you use password authentication (no GSSAPI authentication, no ticket
on the client) with a new user or a user whose password has expired, you
need to enable Challenge-Response authentication. Otherwise, the
password changing dialog will not display.
This is not enabled by default because some older SSH clients may not
support Challenge-Response authentication, and it is needed only if the
password has expired.
To enable Challenge-Response authentication:
Set ChallengeResponseAuthentication to “yes” in
/etc/ssh/sshd_config
The default settings specified by the IPA installation script include
timeout settings that still allow local logins to succeed if the client
cannot access the IPA server. These settings are specified in the
/etc/ldap.conf file, and can be tuned to suit your particular
deployment. A typical deployment would normally include two or more
servers for redundancy, and so this would not normally be a problem.
Caution:
These timeout settings are only set on operating systems that
support the IPA installation script. On other operating systems,
you need to specify these values manually. Failure to do so can
result in the inability to log in to the machine if no IPA servers
are available.
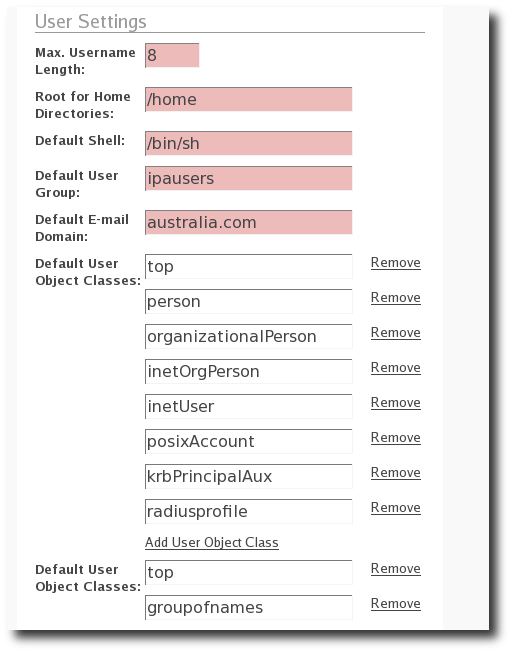
You can specify a range of attributes that are automatically applied to
each new user account that you create. Any changes that you make to the
default settings only apply to newly created accounts; existing accounts
are not affected.
IPA supports the following User Setting attributes:
Max. Username Length: Maximum length of any username. Default is
8.
Root for Home Directories: The root directory for all users’ home
directories. Default is /home
Default Shell: The default shell for all user accounts. Default
is /bin/sh
Default User Group: The default group to which all newly created
accounts are added. The default is ipausers, which is
automatically created during IPA server installation process.
Default E-mail Domain: The default domain used to create e-mail
addresses for all newly created accounts. The default is the domain
to which the IPA server belongs.
Default User Object Classes: The default list of object classes
that can be used to add attributes to user accounts.
Default Group Object Classes: The default list of object classes
that can be used to add attributes to groups.
Note:
The default root directory for users’ home directories is
/home, but it is the responsibility of the system
administrator to ensure that whatever value is specified for this
attribute is actually available.
Red Hat Enterprise Linux and most other Linux distributions
include a pam module called pam_mkhomedir that can be used to
automatically create a home directory if one does not exist for
the user authenticating against the system. IPA does not force the
use of this module because it may try to create home directories
even when the shared storage is simply not available. It is the
responsibility of the system administrator to activate this module
on the clients if needed.
If a suitable directory and mechanism are not available for the
creation of home directories, users may not be able to log in
successfully.
This chapter was developed from the information provided in the
Automount
Howto on
the Fedora Directory Server project page. It is a work in progress and
should not be considered authoritative.
Some preliminary testing has been done on Fedora 9 and Solaris 10 x86
clients with a freeIPA 1.2 server.
You have root access to the server where you want autofs to work.
(For the purposes of this exercise, this server is called
nfsserver.example.com)
The nfsserver.example.com server can communicate with the ldap server
for users/groups.
The NFS service is running on nfsserver.example.com. Configuring NFS
is beyond the scope of this document, but an entry in the
/etc/exports file looks something like this:
Edit the /etc/sysconfig/autofs file and enable the following lines
to tell autofs what attributes to search for:
## Other common LDAP nameing#MAP_OBJECT_CLASS="automountMap"ENTRY_OBJECT_CLASS="automount"MAP_ATTRIBUTE="automountMapName"ENTRY_ATTRIBUTE="automountKey"VALUE_ATTRIBUTE="automountInformation"
You’ll also need to tell it which LDAP server to use and what the search
basedn is:
Test the configuration by getting a directory listing of a user:
root@remote_system~]# ls /home/someuser
If this does not mount the remote filesystem check the
/var/log/messages file for errors or other indications of what the
problem might be. You can also increase the debug level in the
/etc/sysconfig/autofs file by setting LOGGING to debug.
If the NFS server is a Linux server, first tell Solaris that the maximum
supported NFS version is 3 by editing /etc/default/nfs and setting
NFS_CLIENT_VERSMAX=3
You will be using the native nss_ldap to do the automount mapping.
Configure your machine to use LDAP manually with ldapclient:
ldapclient -v manual -a authenticationMethod=none \
 -a defaultSearchBase=dc=example,dc=com \
 -a defaultServerList=ipa.example.com \
 -a serviceSearchDescriptor=passwd:cn=users,cn=accounts,dc=example,dc=com \
 -a serviceSearchDescriptor=group:cn=groups,cn=compat,dc=example,dc=com \
 -a serviceSearchDescriptor=auto_master:automountMapName=auto.master,cn=automoun
t,dc=example,dc=com?one \
 -a serviceSearchDescriptor=auto_home:automountMapName=auto.home,cn=automount,dc
=example,dc=com?one \
 -a objectClassMap=shadow:shadowAccount=posixAccount \
 -a searchTimelimit=15 \
 -a bindTimeLimit=5
Note:
Caution: